

A timing belt jumps a tooth. Someone tightens it, the jumping stops, and the machine runs. A while later the bearings are running hot, the belt is noisy, or the shaft has a bend in it. The belt gets replaced, tightened again, and the cycle repeats.
This is a common pattern. Timing belts, also called synchronous belts, run power transmission drives, linear axes and conveyors for indexing, transfer and pallet handling. In all of them, the same rule holds. Tooth jump is often a belt path, frame or load problem, and tightening alone hides it rather than fixing it. This article covers how a timing belt actually carries load, why extra tension costs so much bearing life, and what to change instead.
Teeth grip, not friction
A flat belt or V-belt drives by friction, so it needs a lot of pretension to keep from slipping. A timing belt drives through its teeth. That means it needs less pretension than a V-belt, and when it is set correctly, the bearing loads stay light.
It also means cranking on the tension doesn't fix much. Tooth jump is often a belt path, frame or load problem, and tightening alone hides it rather than fixing it.
Teeth in mesh and wrap
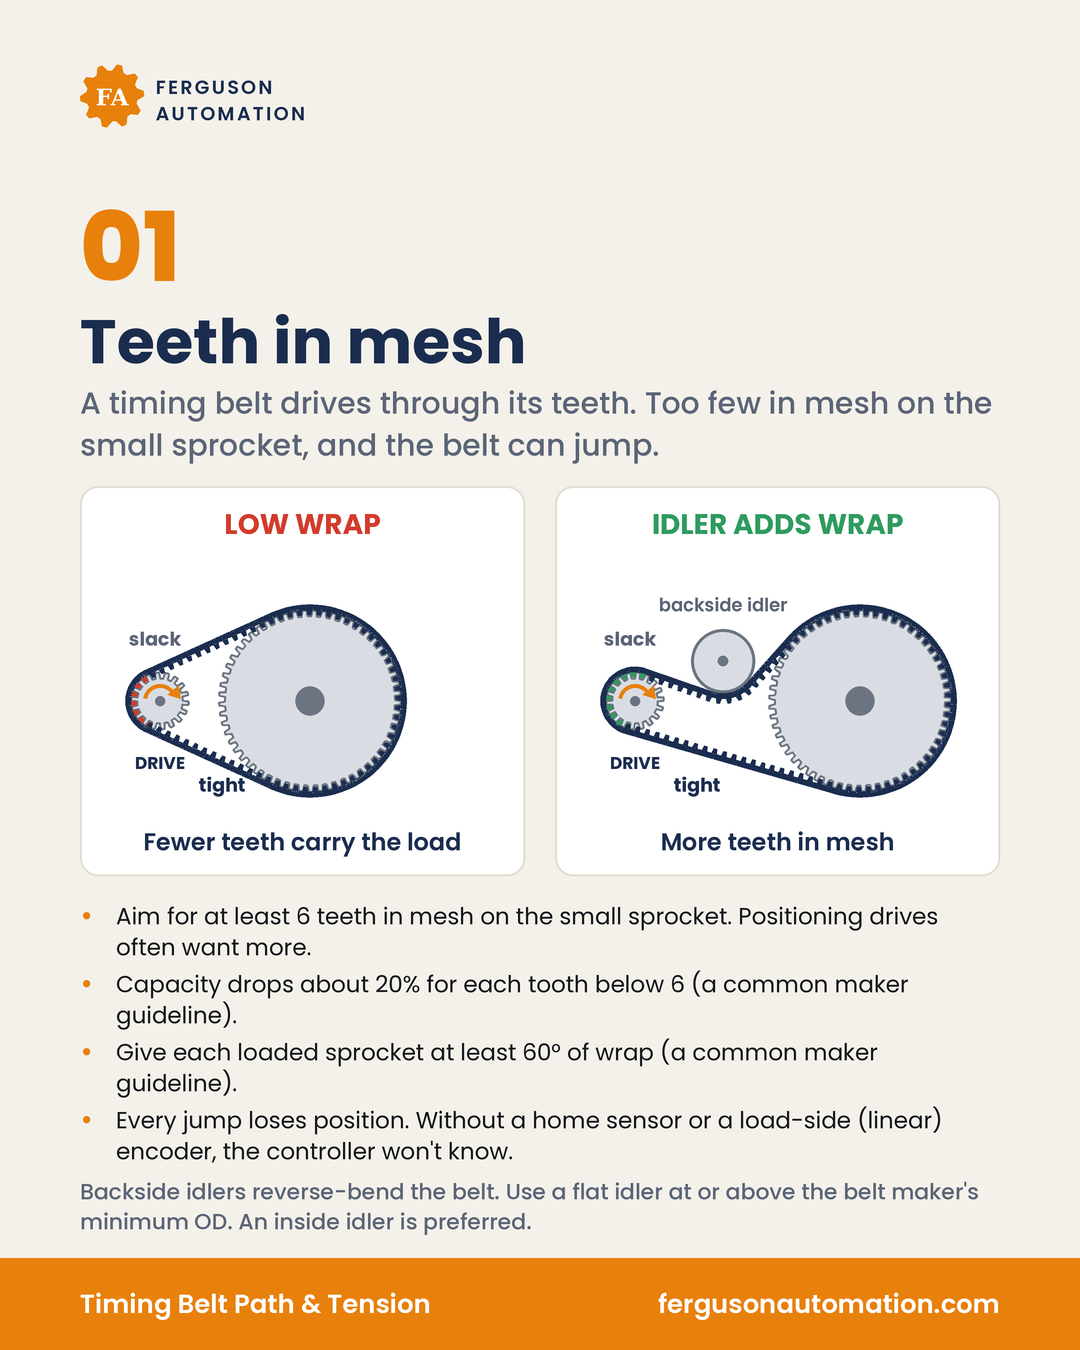
The load is shared by the teeth engaged with the small sprocket. Power ratings for timing belt drives commonly assume at least 6 teeth in mesh on the small sprocket. As a common maker guideline, capacity drops about 20% for each tooth below 6. Positioning and conveyor belt makers are often stricter. There is no universal number, but a good rule is to aim for at least 6, and positioning drives often want more.
In a drive with more than two shafts, a common maker guideline is at least 60° of wrap on each loaded sprocket. A large speed ratio on short centers is a common way to end up with too few teeth in mesh on the small sprocket. A slack-side idler can add wrap and put more teeth to work. Backside idlers reverse-bend the belt, so use a flat idler at or above the belt maker's minimum OD. An inside idler is preferred.
Why timing belts jump teeth
Tooth jump, also called ratcheting, usually comes from one or more of these:
Under-tension. The teeth climb out of the grooves under load.
Shock loads. Hard stops, e-stops and jams can spike the belt load far above running torque.
A frame that isn't rigid. When the frame flexes, the center distance changes and tension drops right when the load peaks.
Too few teeth in mesh. Fewer teeth share the load, so each one carries more.
Ratcheting is hard on more than the belt. Each jump creates large forces that push the shafts apart, which can damage bearings and shafts. In a positioning or indexing drive, every jump also loses position, and the controller won't know about it unless the design includes a home sensor or a load-side (linear) encoder.
Tension: just enough, not more
The goal is to set tension just high enough that the belt doesn't ratchet at the worst-case load. Both directions cause trouble:
Too loose: the teeth climb out and the belt jumps.
Too tight: shorter belt life, bearing and shaft damage, more noise, wear on the land between the teeth, and damage to the tension cords that you can't see from outside.
Use the belt maker's tensioning method and values, and recheck after break-in. A common maker guideline is to tension a new belt slightly higher than a reinstalled one, using the maker's values for each.
What extra load does to bearing life
Rolling bearing rated life follows a simple relationship:
L10 (millions of revolutions) = (C / P)^p
C is the bearing's dynamic load rating, P is the applied load, and the exponent p is 3 for ball bearings and 10/3 for roller bearings.
Because of that exponent, small load increases matter. Adding 10% to the load cuts ball bearing life by about 25%. Doubling the load drops rated life to about 1/8 for a ball bearing and about 1/10 for a roller bearing. Over-tensioning to stop a jump can use up bearing life far faster than designed.
Overhung sprockets
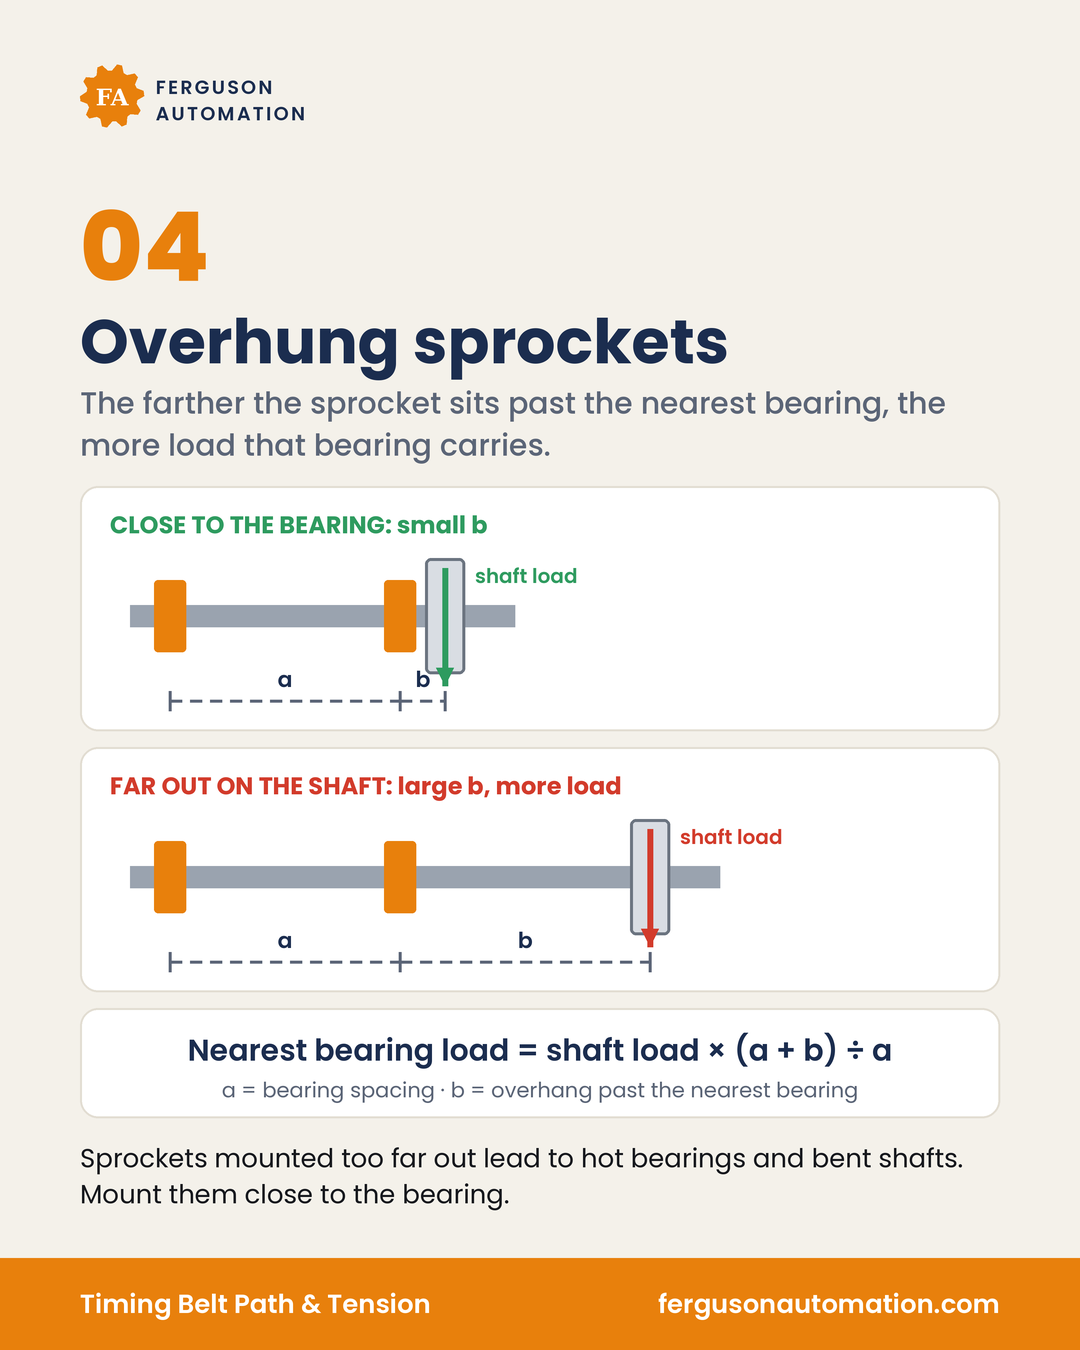
When a sprocket sits out past the nearest bearing, that bearing carries more than the belt pull. With bearings spaced a apart and the sprocket an overhang b past the nearest bearing:
Load on the nearest bearing = shaft load × (a + b) ÷ a
The longer the overhang, the higher that bearing load. Sprockets and sheaves mounted too far out lead to hot bearings and bent shafts. Mount sprockets close to the bearing.
Idlers: which side, which type
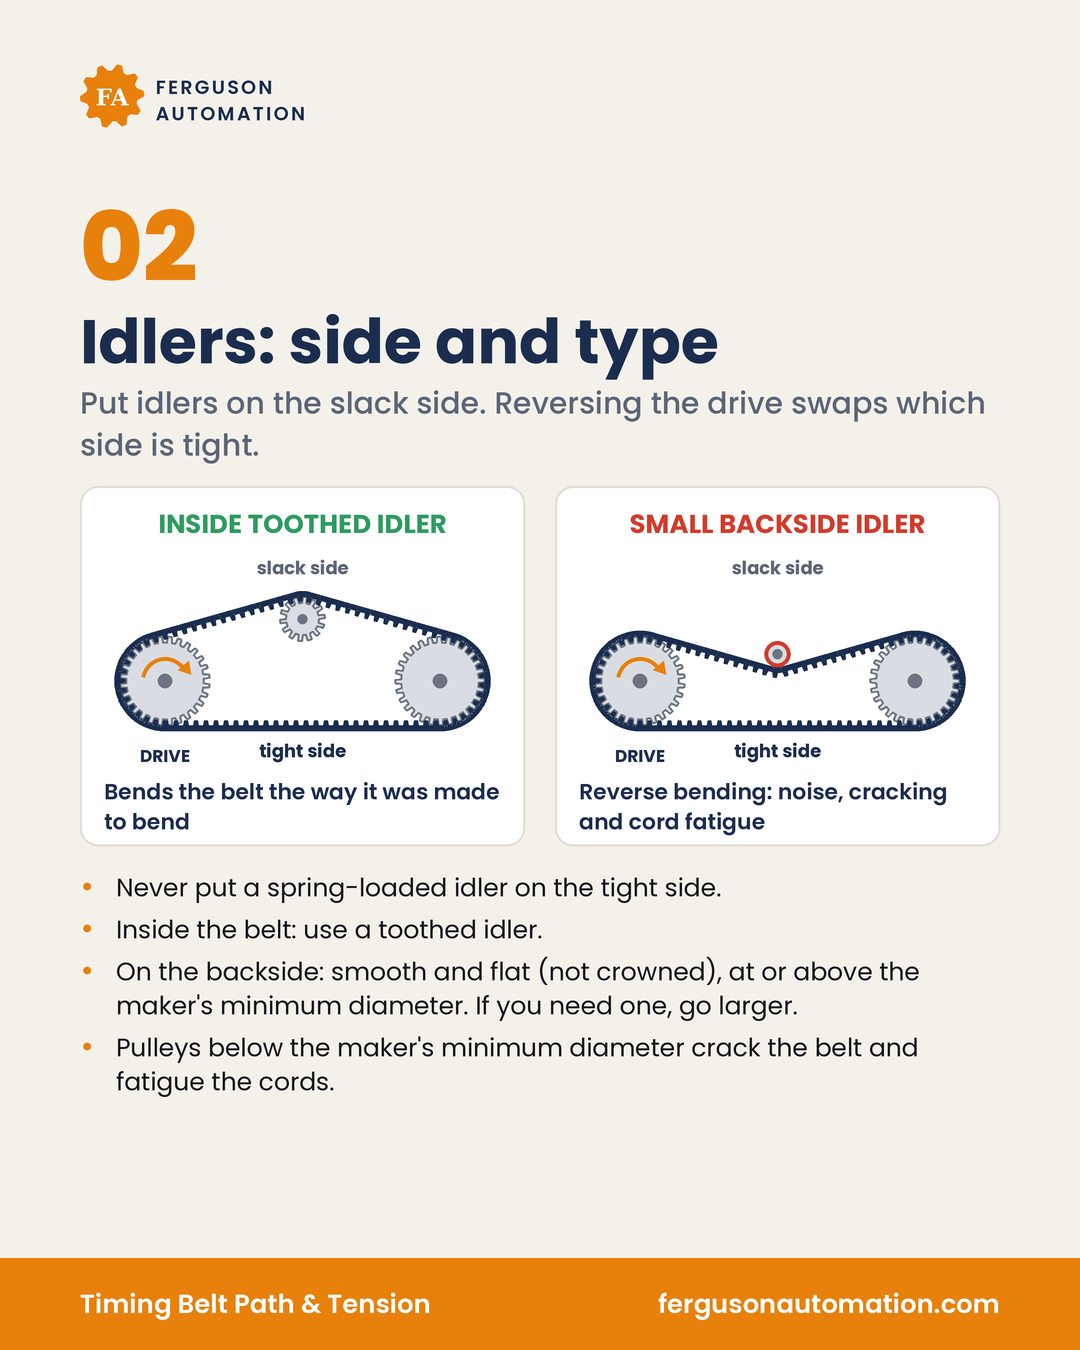
Put idlers on the slack side. Never put a spring-loaded idler on the tight side. Remember that reversing the drive swaps which side is tight.
Inside the belt, use a toothed idler.
On the backside, use a smooth, flat idler, not a crowned one, and keep it above the belt maker's minimum diameter.
Avoid reverse bending where you can. Backside idlers bend the belt backward, which leads to noise, cracking and cord fatigue. An inside idler, or a larger backside idler, is the better choice.
Respect minimum pulley diameters. Pulleys smaller than the maker's minimum lead to cracking and cord fatigue.
Indexing and reversing drives
In indexing and reversing drives, the tight and slack sides flip with direction, and again between acceleration and deceleration. A floating spring or gravity tensioner adds springiness to the system and shows up as position error. Use a locked, adjustable tensioner instead, such as an adjustable idler, a slotted motor plate or a screw take-up, set to the maker's spec.
Flanges and alignment
Timing belts naturally drift to one side because of how their tension cords are wound. That is why they need flanges.
On a two-pulley drive, flange one pulley on both sides, or flange each pulley on opposite sides.
Flange both pulleys on long center distances (more than 8 times the small sprocket diameter) and on vertical shafts.
Light flange contact is normal. A belt riding hard against a flange is a sign of misalignment.
Keep alignment within ¼° or 1/16 in per foot of center distance (about 2.5 mm per 500 mm), or tighter if the belt maker specifies. Square the frame and keep the shafts parallel.
Linear axes
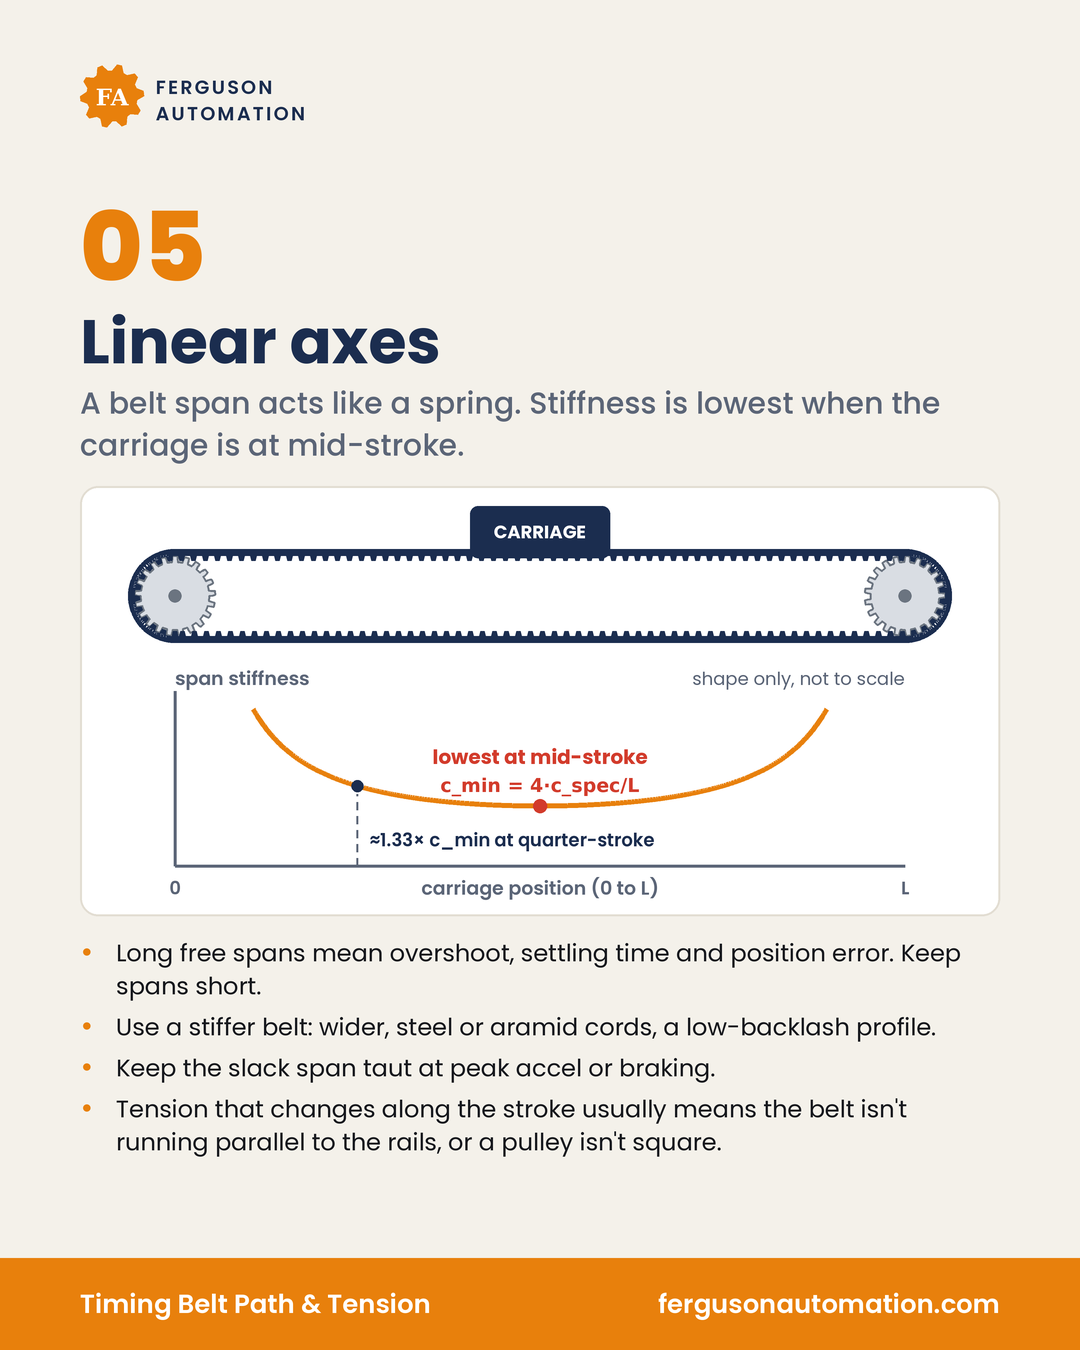
On a belt-driven linear axis, the belt spans act like springs. Span stiffness is lowest when the carriage is at mid-stroke. Long free spans show up as overshoot, longer settling time and position error.
Keep free spans as short as the layout allows.
Use a stiffer belt: wider, with steel or aramid cords, and a low-backlash tooth profile. Older trapezoidal profiles such as XL and L have more tooth clearance and backlash than curved-tooth profiles.
Keep the slack span taut at peak acceleration and braking.
If tension changes along the stroke, the belt usually isn't running parallel to the rails, or a pulley isn't square.
Timing-belt conveyors: indexing, transfer and pallet
Support the belt properly. Sagging or worn slider beds cause product tilt, wear and drag, and that drag loads the teeth. Use flat, wear-resistant beds and support the return side.
Match twin belts. On twin-belt pallet conveyors, unmatched belts make pallets skew. Use matched sets on a common drive shaft, and replace belts in pairs.
Size accumulating conveyors for a full queue. On accumulating pallet conveyors, stopped pallets drag on the moving belt. That drag adds up with every pallet in the queue, so size the drive for a full queue and use a belt back made for sliding under pallets.
Use guided belts where tracking is hard. A molded guide under the belt helps tracking on wide or long belts.
Size for peak loads. Size the drive for peak (shock) loads, not average torque, and soften acceleration and deceleration where the process allows.
How to check a timing belt drive
Lock out and verify zero energy per your plant's procedure before any hands-on inspection or adjustment. Take temperature and noise readings only with guards in place, from outside the guarding.
Measure tension with force-deflection at mid-span or a sonic tension meter, and compare to the maker's values.
Check alignment with a straightedge or laser, to ¼° or 1/16 in per foot of center distance, or tighter if the belt maker specifies.
Count teeth in mesh and check wrap on every loaded sprocket.
Confirm idlers are on the slack side and flanges are set up correctly.
Recheck tension after break-in.
Reading the wear
Tooth shear: Shock loads, too few teeth in mesh, misalignment, under-tension, worn sprocket
Land wear: Excess tension, worn sprockets
Edge wear: Misalignment, rough flange, guard rub
Cracking: Undersized pulley, backside idler, cold starts, chemicals
Noise: Misalignment, wrong tension, backside idler
When to call for help
Some of this is maintenance: set tension to spec, fix alignment, replace worn sprockets. Other problems are built into the layout. If the small sprocket doesn't have enough teeth in mesh, a sprocket hangs too far out on the shaft, or a linear axis has spans too long for the stiffness it needs, no amount of tightening fixes it. The belt path, the sprocket sizes or the mounting has to change.
Belt jumping teeth or bearings running hot? Tell us about it and we can talk through the belt path, tension and sprocket layout. Contact Ferguson Automation